Tag Archives: simple

(Almost) Maxi Dress

Hi!

I’ve wanted to make a maxi dress for a really long time, but haven’t been able to think up/find a pattern that would suit my needs. Simple, but not plain, neat, but not too festive, relaxed, but not too hippy-ie. Sometimes I’m hard to please. But finally, sitting on the couch at home, watching whatever, I came up with this simple dress with a pleated bodice, and knew that that was the one. Luckily I also found a half linen, half cotton bedsheet from the flee market for around 2 € to make it from, so all was good. Unfortunately I was so busy before leaving for the US that I didn’t even have time to take photos of said dress. But here it is now, complete with sunny California! Yay!

front

The skirt is a simple flared thing, nothing special. It was supposed to be full-maxi but I ran out of fabric. Oops.

back

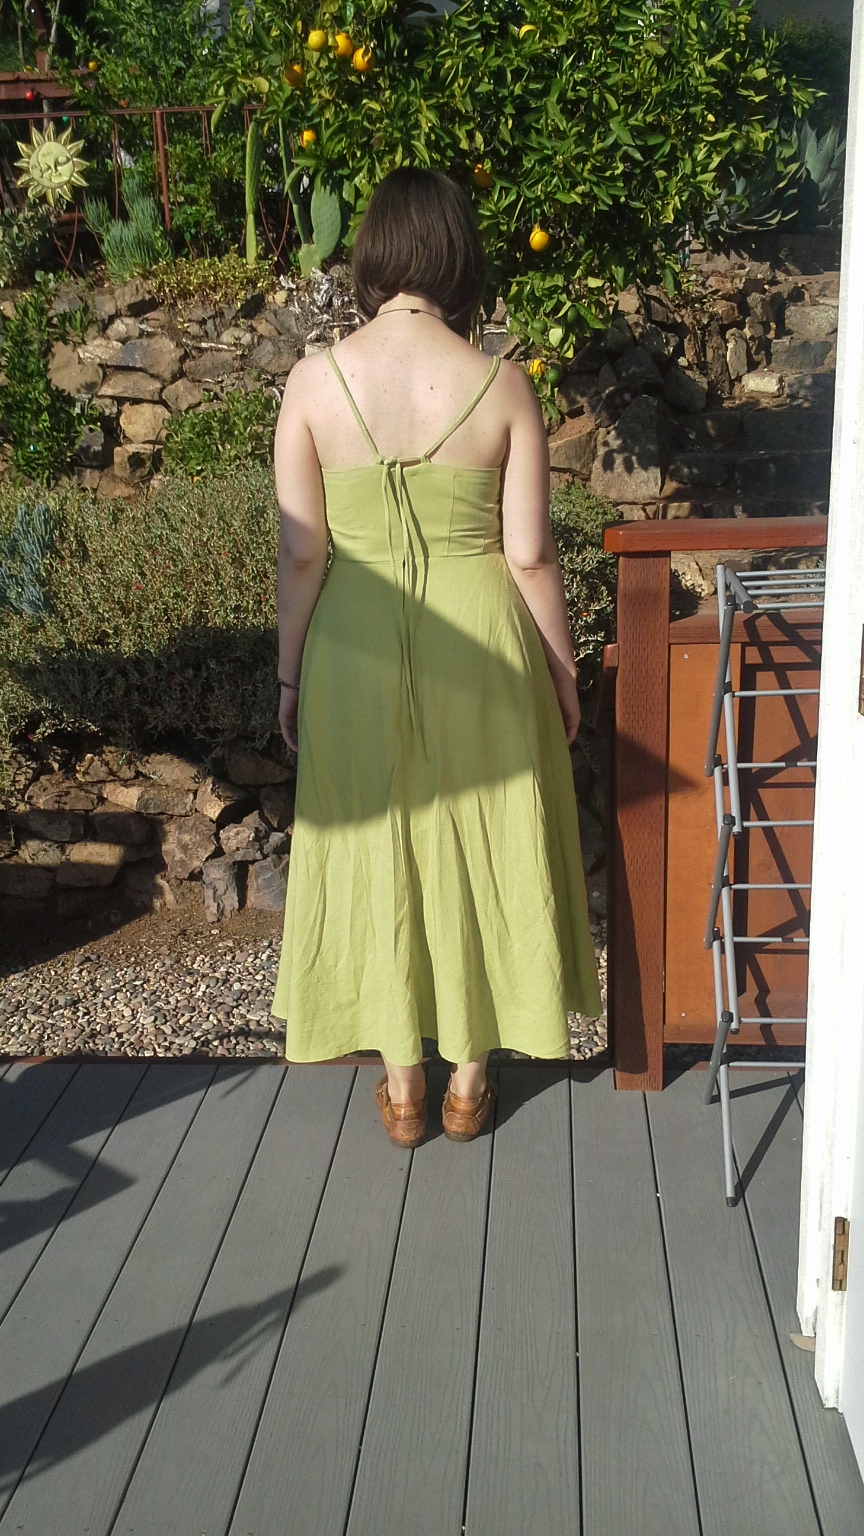
The straps are tied at the back via two small loops, so they are easy to adjust in case they start stretching.

detail

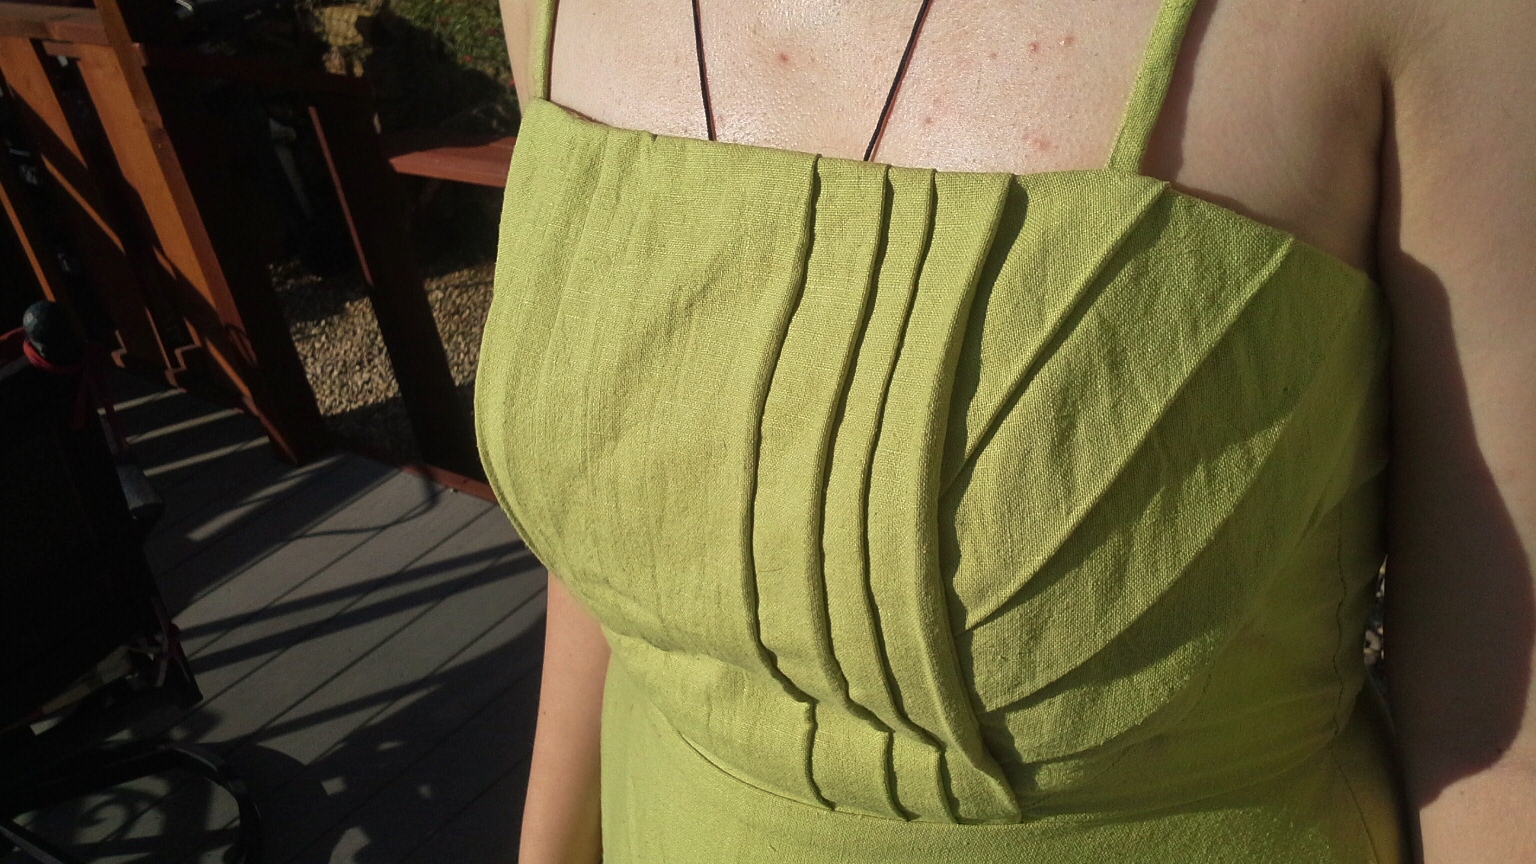
The pleated bodice is lined with a plain version of the same pattern, but some of the pleats still stretch annoyingly, so I’ll have to do some sneaky stitches in there somewhere when I’m bothered enough.


It’s strange to look at these sunny and summery pics when Autumn is already well on the way here in Helsinki. Even though I’m not really a summer person (possibly weird?) I almost miss the sweltering heat of the sun in San Diego when I see it in photos.


– Sadie


Tagged , , , , , ,

Rectangle Skirt Tutorial

Tutorial time!

After making the blue silk blouse I posted about last time, I started wondering what else could be made with a similarly (ridiculously) simple pattern.

I came up with this nifty skirt:

In hindsight the outcome would’ve been better with a drapier or stretchier fabric, but… oh well.

As you can see, it’s just a rectangle with ties (I made mine asymmetrical so that the knot wouldn’t be exactly in the centre).

You can tie the straps to the front or to the back, loose or tight, so this is a nicely versatile piece of clothing.

The How-To Part Of The Tutorial

In addition to fabric you’ll need a zipper. The amount of fabric you need and the length of your zipper will depend on your size, but for reference I used about 1,5 m of fabric and a 30 cm invisible zip.

So, here’s what you’re going to cut out from the fabric (remember to add seam allowance though):

Add a little more seam allowance to the sides of the back piece than to the front one, since it will have a seam in the center (or slightly to the side if you go asymmetrical like me). If you’re cutting the front and back pieces at the same time, from a double layer of fabric, remember to cut the back piece in half afterwards.

Construction:

Start by sewing and turning the straps as shown below.

Next, pin and sew two of the back waistband pieces to the pack pieces like so:

Then do the same with one of the front waistband pieces and the front piece:

After this, pin and sew the back and front together, but don’t do anything to the side seams at this point. And remember, when you eventually turn the skirt, you’ll have to snip a bit at the corners next to the waistband to get the thing turned nice and neat.

Next, sew the side seams, making sure that the straps are sandwiched between the front and back pieces.

Then, sew in the zipper. I used an invisible zipper presser foot to sew in my zip — something I’ve never used before, but it worked phenomenally well. After sewing in the zipper, sew up the rest of the back seam (unless your using a normal zipper, then I guess you can do it in the order you prefer).

Now pin and hem the hem (man that sounds silly).

Sew together the remaining waist band pieces, and then pin and sew them to the waistband already attached to the skirt, right sides together. Turn and iron down, making sure that the area around the zipper is nice and neat. After this, hand stitch the turned waistband to the skirt, along the seam where my thumb is on in the pic below:

Now just iron the finished skirt and you’re done! Yay! I hope my instructions weren’t to complicated :)

Happy sewing!

Tagged , , ,